本文会介绍Android的消息处理机制。
目录
1. Android消息机制的架构
2. Android消息机制的源码解析
2.1. 消息循环
2.2. 消息的发送
2.3. 消息的处理注意:本文是基于Android 4.4.2版本进行介绍的!
Android消息机制的架构
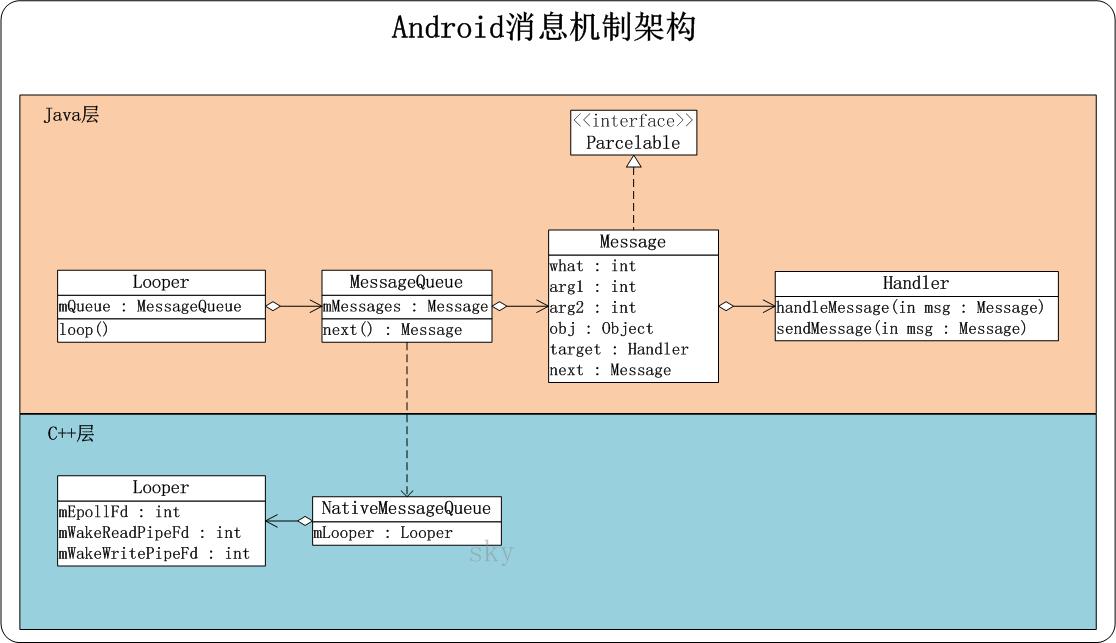
上面是消息机制的框架图。
(01) Looper是消息循环类,它包括了mQueue成员变量;mQueue是消息队列MessageQueue的实例。Looper还包含了loop()方法,通过调用loop()就能进入到消息循环中。
(02) MessageQueue是消息队列类,它包含了mMessages成员;mMessages是消息Message的实例。MessageQueue提供了next()方法来获取消息队列的下一则消息。
(03) Message是消息类。Message包含了next,next是Message的实例;由此可见,Message是一个单链表。Message还包括了target成员,target是Handler实例。此外,它还包括了arg1,arg2,what,obj等参数,它们都是用于记录消息的相关内容。
(04) Handler是消息句柄类。Handler提供了sendMessage()来向消息队列发送消息;发送消息的API有很多,它们的原理都是一样的,这里仅仅只列举了sendMessage()一个。 此外,Handler还提供了handleMessage()来处理消息队列的消息;这样,用户通过覆盖handleMessage()就能处理相应的消息。
消息机制位于Java层的框架主要就有上面4个类所组成。在C++层,比较重要的是NativeMessageQueue和Loop这两个类。
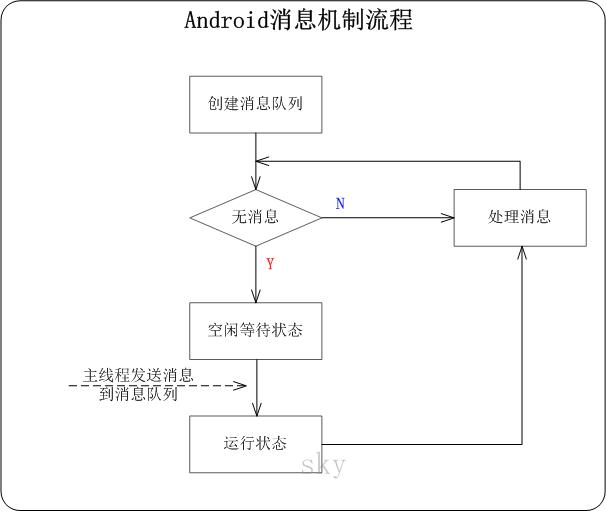
当我们启动一个APK时,ActivityManagerService会为我们的Activity创建并启动一个主线程(ActivityThread对象);在启动主线程时,就会创建主线程对应的消息循环,并通过调用loop()进入到消息循环中。当我们需要往消息队列发送消息时,可以继承Handler类,然后创建Handler类的实例;接着,通过该实例的sendMessage()方法就可以向消息队列发送消息。 也就是说,主线程的消息队列也一直存在的。当消息队列中没有消息时,消息队列会进入空闲等待状态;当有消息时,则消息队列会进入运行状态,进而将相应的消息发送给handleMessage()进行处理。
下面是消息机制的流程图:消息队列没有消息时进入空闲等待,有消息时才获取并发送消息。这种机制是通过pipe(管道)机制实现的,关于pipe机制的相关内容,后面再详细说明。
Android消息机制的源码解析
下面从"消息循环、消息发送和消息处理"这3个方面对消息机制进行介绍。
1. 消息循环
Looper是消息循环类。下面先看看ActivityThread中是如何使用Looper的。
public final class ActivityThread {

    ...

    public static void main(String[] args) {

        ...

        Looper.prepareMainLooper();

        ActivityThread thread = new ActivityThread();
        thread.attach(false);

        ...

        Looper.loop();

        ...
    }
}
说明:上面是frameworks/base/core/java/android/app/ActivityThread.java中的main()函数代码。
通常在新打开一个APK界面时,系统会为APK启动创建一个ActivityThread对象,并调用它的main()方法。该main函数主要做了两件事:(01),新建ActivityThread对象。 (02),使用主线程进入消息循环。
public final class Looper {
    private static final String TAG = "Looper";

    static final ThreadLocal<Looper> sThreadLocal = new ThreadLocal<Looper>();
    private static Looper sMainLooper;  // guarded by Looper.class

    final MessageQueue mQueue;
    final Thread mThread;

    public static void prepare() {
        prepare(true);
    }

    private static void prepare(boolean quitAllowed) {
        if (sThreadLocal.get() != null) {
            throw new RuntimeException("Only one Looper may be created per thread");
        }
        sThreadLocal.set(new Looper(quitAllowed));
    }

    public static void prepareMainLooper() {
        prepare(false);
        synchronized (Looper.class) {
            if (sMainLooper != null) {
                throw new IllegalStateException("The main Looper has already been prepared.");
            }
            sMainLooper = myLooper();
        }
    }

    public static Looper getMainLooper() {
        synchronized (Looper.class) {
            return sMainLooper;
        }
    }

    public static Looper myLooper() {
        return sThreadLocal.get();
    }

    private Looper(boolean quitAllowed) {
        mQueue = new MessageQueue(quitAllowed);
        mThread = Thread.currentThread();
    }

    ...
}
说明:上面是frameworks/base/core/java/android/os/Looper.java中创建消息循环的相关代码。
(01), prepareMainLooper()是新调用prepare()创建一个Looper对象,并且该Looper对象对应的消息队列是不能退出(quit)的。
(02), 新建的Looper对象是存放在sThreadLocal成员变量里面的,而sThreadLocal的类型为ThreadLocal。这意味着,它是一个线程局部变量,即保证每一个调用了prepareMainLooper函数的线程里面都有一个独立的Looper对象。
(03),Looper()的构造函数中会新建消息队列MessageQueue对象,并且将当前的主线程保存到mThread中。实际上,Looper中的消息都是通过存放到MessageQueue消息队列中再进行处理的。
public final class MessageQueue {

    // True if the message queue can be quit.
    private final boolean mQuitAllowed;

    @SuppressWarnings("unused")
    private int mPtr; // used by native code

    private native static int nativeInit();

    ...

    MessageQueue(boolean quitAllowed) {
        mQuitAllowed = quitAllowed;
        mPtr = nativeInit();
    }

    ...
}
说明:该代码在frameworks/base/core/java/android/os/MessageQueue.java中。MessageQueue的构造函数会执行nativeInit(),nativeInit()是一个JNI函数,它的实现在frameworks/base/core/jni/android_os_MessageQueue.cpp中。
static jint android_os_MessageQueue_nativeInit(JNIEnv* env, jclass clazz) {
    NativeMessageQueue* nativeMessageQueue = new NativeMessageQueue();
    if (!nativeMessageQueue) {
        jniThrowRuntimeException(env, "Unable to allocate native queue");
        return 0;
    }

    nativeMessageQueue->incStrong(env);
    return reinterpret_cast<jint>(nativeMessageQueue);
}
说明:该代码在frameworks/base/core/jni/android_os_MessageQueue.cpp中。android_os_MessageQueue_nativeInit()是与nativeInit()对应的JNI函数。
(01) 在该函数中,会新建NativeMessageQueue对象。这是我们分析的重点。
(02) nativeMessageQueue->incStrong(env); 它的作用是增加引用计数。
NativeMessageQueue::NativeMessageQueue() : mInCallback(false), mExceptionObj(NULL) {
    mLooper = Looper::getForThread();
    if (mLooper == NULL) {
        mLooper = new Looper(false);
        Looper::setForThread(mLooper);
    }
}
说明:该代码在frameworks/base/core/jni/android_os_MessageQueue.cpp中。NativeMessageQueue继承于MessageQueue,而MessageQueue包含mLooper成员,mLooper是一个Looper对象。 该函数中,会新建Looper对象,并调用setForThread()。
Looper::Looper(bool allowNonCallbacks) :
        mAllowNonCallbacks(allowNonCallbacks), mSendingMessage(false),
        mResponseIndex(0), mNextMessageUptime(LLONG_MAX) {
    int wakeFds[2];
    int result = pipe(wakeFds);
    LOG_ALWAYS_FATAL_IF(result != 0, "Could not create wake pipe.  errno=%d", errno);

    mWakeReadPipeFd = wakeFds[0];
    mWakeWritePipeFd = wakeFds[1];

    result = fcntl(mWakeReadPipeFd, F_SETFL, O_NONBLOCK);
    LOG_ALWAYS_FATAL_IF(result != 0, "Could not make wake read pipe non-blocking.  errno=%d",
            errno);

    result = fcntl(mWakeWritePipeFd, F_SETFL, O_NONBLOCK);
    LOG_ALWAYS_FATAL_IF(result != 0, "Could not make wake write pipe non-blocking.  errno=%d",
            errno);

    mIdling = false;

    // Allocate the epoll instance and register the wake pipe.
    mEpollFd = epoll_create(EPOLL_SIZE_HINT);
    LOG_ALWAYS_FATAL_IF(mEpollFd < 0, "Could not create epoll instance.  errno=%d", errno);

    struct epoll_event eventItem;
    memset(& eventItem, 0, sizeof(epoll_event)); // zero out unused members of data field union
    eventItem.events = EPOLLIN;
    eventItem.data.fd = mWakeReadPipeFd;
    result = epoll_ctl(mEpollFd, EPOLL_CTL_ADD, mWakeReadPipeFd, & eventItem);
    LOG_ALWAYS_FATAL_IF(result != 0, "Could not add wake read pipe to epoll instance.  errno=%d",
            errno);
}
说明:该代码在system/core/libutils/Looper.cpp中。Looper构造函数所在做的事情非常重要,它跟消息机制的原理息息相关:Looper是通过管道(pipe)实现的。
关于管道,简单来说,管道就是一个文件。
在管道的两端,分别是两个打开文件文件描述符,这两个打开文件描述符都是对应同一个文件,其中一个是用来读的,别一个是用来写的。
一般的使用方式就是,一个线程通过读文件描述符中来读管道的内容,当管道没有内容时,这个线程就会进入等待状态,而另外一个线程通过写文件描述符来向管道中写入内容,写入内容的时候,如果另一端正有线程正在等待管道中的内容,那么这个线程就会被唤醒。这个等待和唤醒的操作是如何进行的呢,这就要借助Linux系统中的epoll机制了。 Linux系统中的epoll机制为处理大批量句柄而作了改进的poll,是Linux下多路复用IO接口select/poll的增强版本,它能显著减少程序在大量并发连接中只有少量活跃的情况下的系统CPU利用率。
(01) pipe(wakeFds),该函数创建了两个管道句柄。
(02) mWakeReadPipeFd=wakeFds[0],是读管道的句柄。
(03) mWakeWritePipeFd=wakeFds[1],是写管道的句柄。
(04) epoll_create(EPOLL_SIZE_HINT)是创建epoll句柄。
(05) epoll_ctl(mEpollFd, EPOLL_CTL_ADD, mWakeReadPipeFd, & eventItem),它的作用是告诉mEpollFd,它要监控mWakeReadPipeFd文件描述符的EPOLLIN事件,即当管道中有内容可读时,就唤醒当前正在等待管道中的内容的线程。
至此,就介绍完消息循环的创建/准备阶段。该节点的主要工作可以概括为2部分内容:
(01) Java层,创建Looper对象,Looper的构造函数中会创建消息队列MessageQueue的对象。MessageQueue的作用存储消息队列,用来管理消息的。
(02) C++层,消息队列创建时,会调用JNI函数,初始化NativeMessageQueue对象。NativeMessageQueue则会初始化Looper对象。Looper的作用就是,当Java层的消息队列中没有消息时,就使Android应用程序主线程进入等待状态,而当Java层的消息队列中来了新的消息后,就唤醒Android应用程序的主线程来处理这个消息。
下面分析Looper.loop()函数。
public final class Looper {

    ...

    public static void loop() {
        final Looper me = myLooper();
        if (me == null) {
            throw new RuntimeException("No Looper; Looper.prepare() wasn't called on this thread.");
        }
        final MessageQueue queue = me.mQueue;

        ...

        for (;;) {
            Message msg = queue.next(); // might block
            if (msg == null) {
                return;
            }

            ...

            msg.target.dispatchMessage(msg);

            ...

            msg.recycle();
        }
    }

    ...
}
说明:loop()的作用就是不断的从消息队列中获取消息,然后分发处理。
(01) myLooper(),是获取当前的Looper对象;而mQueue则是Looper对应的消息队列对象。
(02) queue.next()是消息队列的下一个要处理消息。如果消息为空,则退出loop循环;否则,调用dispatchMessage()分发消息。
Message next() {
    int pendingIdleHandlerCount = -1; // -1 only during first iteration
    int nextPollTimeoutMillis = 0;
    for (;;) {
        if (nextPollTimeoutMillis != 0) {
            Binder.flushPendingCommands();
        }

        // 调用JNI函数Poll消息。nextPollTimeoutMillis是消息队列中没消息时的等待时间。
        // (01) nextPollTimeoutMillis = 0,不等待。
        // (02) nextPollTimeoutMillis = -1,无限等待。
        nativePollOnce(mPtr, nextPollTimeoutMillis);

        synchronized (this) {
            final long now = SystemClock.uptimeMillis();
            Message prevMsg = null;
            Message msg = mMessages;
            // 如果当前消息非空,但是当前消息的目标是空;则获取下一则消息。
            if (msg != null && msg.target == null) {
                do {
                    prevMsg = msg;
                    msg = msg.next;
                } while (msg != null && !msg.isAsynchronous());
            }
            if (msg != null) {
                if (now < msg.when) {
                    // 如果消息队列中有消息,并且当前时间小于于消息中的执行时间,
                    // 则设置消息的等待时间
                    nextPollTimeoutMillis = (int) Math.min(msg.when - now, Integer.MAX_VALUE);
                } else {
                    // 如果消息队列中有消息,并且当前时间大于/等于消息中的执行时间,
                    // 则将该消息返回给Looper。
                    mBlocked = false;
                    if (prevMsg != null) {
                        prevMsg.next = msg.next;
                    } else {
                        mMessages = msg.next;
                    }
                    msg.next = null;
                    if (false) Log.v("MessageQueue", "Returning message: " + msg);
                    msg.markInUse();
                    return msg;
                }
            } else {
                // 如果消息队列中无消息,则设置nextPollTimeoutMillis=-1;
                // 下次调用nativePollOnce()时,则会进入无穷等待状态。
                nextPollTimeoutMillis = -1;
            }

            // 如主线程调用的quit()函数,则退出消息循环。
            if (mQuitting) {
                dispose();
                return null;
            }

            // 查看空闲等待(不是忙等待)对应的pendingIdleHandlerCount数量。
            // 如果pendingIdleHandlerCount=0,则继续下一次循环。
            if (pendingIdleHandlerCount < 0
                    && (mMessages == null || now < mMessages.when)) {
                pendingIdleHandlerCount = mIdleHandlers.size();
            }
            if (pendingIdleHandlerCount <= 0) {
                // No idle handlers to run.  Loop and wait some more.
                mBlocked = true;
                continue;
            }

            if (mPendingIdleHandlers == null) {
                mPendingIdleHandlers = new IdleHandler[Math.max(pendingIdleHandlerCount, 4)];
            }
            // 将mIdleHandlers转换位数组
            mPendingIdleHandlers = mIdleHandlers.toArray(mPendingIdleHandlers);
        }

        // 执行mPendingIdleHandlers中每一个IdleHandler的queueIdle(),
        // 即,进行空闲等待。
        for (int i = 0; i < pendingIdleHandlerCount; i++) {
            final IdleHandler idler = mPendingIdleHandlers[i];
            mPendingIdleHandlers[i] = null; // release the reference to the handler

            boolean keep = false;
            try {
                keep = idler.queueIdle();
            } catch (Throwable t) {
                Log.wtf("MessageQueue", "IdleHandler threw exception", t);
            }

            if (!keep) {
                synchronized (this) {
                    mIdleHandlers.remove(idler);
                }
            }
        }

        // Reset the idle handler count to 0 so we do not run them again.
        pendingIdleHandlerCount = 0;

        // While calling an idle handler, a new message could have been delivered
        // so go back and look again for a pending message without waiting.
        nextPollTimeoutMillis = 0;
    }
}
说明:next()的作用是获取消息队列的下一条待处理消息。该函数可能导致主线程进入等待状态。源码中已经消息标明了注释,这里就不再重复说明了。 下面分析next()中的nativePollOnce(),它对应的实现函数是android_os_MessageQueue_nativePollOnce()。
static void android_os_MessageQueue_nativePollOnce(JNIEnv* env, jclass clazz,
        jint ptr, jint timeoutMillis) {
    NativeMessageQueue* nativeMessageQueue = reinterpret_cast<NativeMessageQueue*>(ptr);
    nativeMessageQueue->pollOnce(env, timeoutMillis);
}
说明:该函数调用了pollOnce()。
void NativeMessageQueue::pollOnce(JNIEnv* env, int timeoutMillis) {
    ...
    mLooper->pollOnce(timeoutMillis);
    ...
}
说明:NativeMessageQueue的pollOnce(),调用了Looper.java中(即mLooper)的pollOnce()。
int Looper::pollOnce(int timeoutMillis, int* outFd, int* outEvents, void** outData) {
    ...
    int result = 0;
    for (;;) {
        ...

        if (result != 0) {
            ...
            return result;
        }

        result = pollInner(timeoutMillis);
    }
}
说明:pollOnce()调用了pollInner()。
int Looper::pollInner(int timeoutMillis) {

    ...

    // 通过epoll_wait()等待mEpollFd上IO事件的发生
    struct epoll_event eventItems[EPOLL_MAX_EVENTS];
    int eventCount = epoll_wait(mEpollFd, eventItems, EPOLL_MAX_EVENTS, timeoutMillis);

    ...

    // 如果epoll_wait()时出错,则直接跳到Done处。
    if (eventCount < 0) {
        ...
        goto Done;
    }

    // 如果没有IO事件发生,则直接跳到Done处。
    if (eventCount == 0) {
        ...
        goto Done;
    }

    // 如果有IO事件发生,则逐个取出IO事件,如果是写事件(EPOLLIN),则调用awoken()
    for (int i = 0; i < eventCount; i++) {
        int fd = eventItems[i].data.fd;
        uint32_t epollEvents = eventItems[i].events;
        if (fd == mWakeReadPipeFd) {
            if (epollEvents & EPOLLIN) {
                awoken();
            } else {
                ALOGW("Ignoring unexpected epoll events 0x%x on wake read pipe.", epollEvents);
            }
        } else {
            ...
        }
    }

Done: ;

    ...

    return result;
}
说明:pollInner()就是先通过epoll_wait()进入空闲等待状态,等待消息队列的管道上的消息(IO事件)。如果有消息待处理(即管道上有IO写事件发生,写事件是EPOLLIN类型),则调用awoken()将消息读取出来。
void Looper::awoken() {
    ...

    char buffer[16];
    ssize_t nRead;
    do {
        nRead = read(mWakeReadPipeFd, buffer, sizeof(buffer));
    } while ((nRead == -1 && errno == EINTR) || nRead == sizeof(buffer));
}
说明:awoken()的作用只是把管道中的内容都读取出来。在了解了后面将介绍的"发送消息"之后,会了解到,这里读取的数据内容是无所谓的(实际上读取到的数据就是一个"w")。重要的是,通过往管道中读/写数据来使处于等待状态的主线程继续运行。
至此,"消息循环"部分就介绍完毕了!
回到Looper.loop()中,next()获取到了消息队列的下一则待处理的消息之后;接着,会调用dispatchMessage()来分发处理消息了。dispatchMessage()的内容,我们放到后面的"消息的处理"部分再来介绍。
2. 消息的发送
还是以ActivityThread为例,看看如何发送消息。在启动Activity时,会调用scheduleLaunchActivity(),下面看看scheduleLaunchActivity()是如何发送消息的。
public final class ActivityThread {
    ...

    private class ApplicationThread extends ApplicationThreadNative {
        ...

        public final void scheduleLaunchActivity(Intent intent, IBinder token, int ident,
                ActivityInfo info, Configuration curConfig, CompatibilityInfo compatInfo,
                int procState, Bundle state, List<ResultInfo> pendingResults,
                List<Intent> pendingNewIntents, boolean notResumed, boolean isForward,
                String profileName, ParcelFileDescriptor profileFd, boolean autoStopProfiler) {

            ...

            sendMessage(H.LAUNCH_ACTIVITY, r);
        }

        ...
    }

    ...

    private void sendMessage(int what, Object obj) {
        sendMessage(what, obj, 0, 0, false);
    }

    private void sendMessage(int what, Object obj, int arg1, int arg2, boolean async) {

        Message msg = Message.obtain();
        msg.what = what;
        msg.obj = obj;
        msg.arg1 = arg1;
        msg.arg2 = arg2;
        if (async) {
            msg.setAsynchronous(true);
        }
        mH.sendMessage(msg);
    }

    ...
}
说明:scheduleLaunchActivity()定义在类ApplicationThread中,而ApplicationThread是ActivityThread的内部类。
(01) scheduleLaunchActivity()调用sendMessage()发送消息,实际上是调用的ActivityThread类中的sendMessage。
(02) 在sendMessage()中,会新建一个Message;然后调用mH.sendMessage(msg)来发送消息。
public final class ActivityThread {

    ...

    final H mH = new H();

    ...

    private class H extends Handler {
        ...

        public void handleMessage(Message msg) {
            ...

            switch (msg.what) {
                case LAUNCH_ACTIVITY: {
                    Trace.traceBegin(Trace.TRACE_TAG_ACTIVITY_MANAGER, "activityStart");
                    ActivityClientRecord r = (ActivityClientRecord)msg.obj;

                    r.packageInfo = getPackageInfoNoCheck(
                            r.activityInfo.applicationInfo, r.compatInfo);
                    handleLaunchActivity(r, null);
                    Trace.traceEnd(Trace.TRACE_TAG_ACTIVITY_MANAGER);
                } break;

                ...
            }
        }
    }
}
说明:mH是H实例,H继承于Handler。sendMessage()的实现在Handler中,下面看看它的实现代码。
public class Handler {

    ...

    public final boolean sendMessage(Message msg)
    {
        return sendMessageDelayed(msg, 0);
    }

    public final boolean sendMessageDelayed(Message msg, long delayMillis)
    {
        if (delayMillis < 0) {
            delayMillis = 0;
        }
        return sendMessageAtTime(msg, SystemClock.uptimeMillis() + delayMillis);
    }

    public boolean sendMessageAtTime(Message msg, long uptimeMillis) {
        MessageQueue queue = mQueue;
        if (queue == null) {
            RuntimeException e = new RuntimeException(
                    this + " sendMessageAtTime() called with no mQueue");
            Log.w("Looper", e.getMessage(), e);
            return false;
        }
        return enqueueMessage(queue, msg, uptimeMillis);
    }

    private boolean enqueueMessage(MessageQueue queue, Message msg, long uptimeMillis) {
        msg.target = this;
        if (mAsynchronous) {
            msg.setAsynchronous(true);
        }
        return queue.enqueueMessage(msg, uptimeMillis);
    }

    ...
}
说明:该代码在frameworks/base/core/java/android/os/Handler.java中。
(01) sendMessage()调用sendMessageDelayed(msg, delayMillis)。sendMessageDelayed(msg, delayMillis)是延时发送消息函数,sendMessage()传入的delayMillis=0,表示延时是0。
(02) sendMessageDelayed()调用sendMessageAtTime()。sendMessageAtTime()是指定消息的执行时间的函数。
(03) sendMessageAtTime()调用enqueueMessage()。
(04) enqueueMessage()queue.enqueueMessage()将消息添加到消息队列中。
public final class MessageQueue {

    ...

    boolean enqueueMessage(Message msg, long when) {

        ...

        synchronized (this) {
            if (mQuitting) {
                return false;
            }

            msg.when = when;
            Message p = mMessages;
            boolean needWake;
            if (p == null || when == 0 || when < p.when) {
                // 消息队列无消息
                msg.next = p;
                mMessages = msg;
                needWake = mBlocked;
            } else {
                // 消息队列有消息。将当前消息插入到适当的位置
                needWake = mBlocked && p.target == null && msg.isAsynchronous();
                Message prev;
                for (;;) {
                    prev = p;
                    p = p.next;
                    if (p == null || when < p.when) {
                        break;
                    }
                    if (needWake && p.isAsynchronous()) {
                        needWake = false;
                    }
                }
                msg.next = p; // invariant: p == prev.next
                prev.next = msg;
            }

            // 唤醒主线程
            if (needWake) {
                nativeWake(mPtr);
            }
        }
        return true;
    }

    ...

}
说明:enqueueMessage()会将消息加入到消息队列中。把消息加入到消息队列时,分2种情况:
(01),消息队列为空。 这时候应用程序的主线程一般就是处于空闲等待状态了,这时候就要唤醒它。
(02),消息队列不为空。 这时候就不需要唤醒应用程序的主线程了,因为这时候它一定是在忙着处于消息队列中的消息,因此不会处于空闲等待的状态。
在添加完消息之后,如果主线程需要唤醒,则调用nativeWake()。nativeWake()是个JNI函数,它对应的实现是frameworks/base/core/jni/android_os_MessageQueue.cpp中的android_os_MessageQueue_nativeWake()。
static void android_os_MessageQueue_nativeWake(JNIEnv* env, jclass clazz, jint ptr) {
    NativeMessageQueue* nativeMessageQueue = reinterpret_cast<NativeMessageQueue*>(ptr);
    return nativeMessageQueue->wake();
}
说明:该函数会调用NativeMessageQueue类中的wake()。
void NativeMessageQueue::wake() {
    mLooper->wake();
}
说明:该函数会调用system/core/libutils/Looper.cpp中的wake()。mLooper是创建NativeMessageQueue时创建的Looper对象,这在前面已经介绍过了。
void Looper::wake() {

    ...

    ssize_t nWrite;
    do {
        nWrite = write(mWakeWritePipeFd, "W", 1);
    } while (nWrite == -1 && errno == EINTR);

    ...
}
说明:wake()的作用很简单,就是通过打开文件描述符mWakeWritePipeFd往管道的写入一个"W"字符串。
其实,往管道写入什么内容并不重要,往管道写入内容的目的是为了唤醒应用程序的主线程。前面我们在分析应用程序的消息循环时说到,当应用程序的消息队列中没有消息处理时,应用程序的主线程就会进入空闲等待状态,而这个空闲等待状态就是通过调用这个Looper类的pollInner()函数来进入的,具体就是在pollInner()函数中调用epoll_wait()函数来等待管道中有内容可读的。这样,就将发送消息和接收消息联系起来了。
3. 消息的处理
前面介绍了"消息的发送过程";而且我们又知道,在"消息循环"中,会不断读取消息,然后调用dispatchMessage()来分发处理。
public final class Looper {

    ...

    public static void loop() {
        final Looper me = myLooper();
        if (me == null) {
            throw new RuntimeException("No Looper; Looper.prepare() wasn't called on this thread.");
        }
        final MessageQueue queue = me.mQueue;

        ...

        for (;;) {
            // 取出消息
            Message msg = queue.next(); // might block
            if (msg == null) {
                return;
            }

            ...

            // 分发处理
            msg.target.dispatchMessage(msg);

            ...

            msg.recycle();
        }
    }

    ...
}
说明:上面就是loop()消息循环的代码,这在前面已经介绍过了。首先,从消息队列中通过next()取出消息;然后通过dispatchMessage()分发消息。
下面,现看看msg.target是什么对象。
public class Handler {

    ...

    private boolean enqueueMessage(MessageQueue queue, Message msg, long uptimeMillis) {
        msg.target = this;
        if (mAsynchronous) {
            msg.setAsynchronous(true);
        }
        return queue.enqueueMessage(msg, uptimeMillis);
    }

    ...
}
说明:实际上,msg.target是在"发送消息时"调用的enqueueMessage()中赋值的。this就是Handler对象,而在"消息的发送"中,真正发送消息的是Handler的子类H。也就是说,this是类H的实例。
public final class ActivityThread {

    ...

    private class H extends Handler {
        ...
    }

    ...

}
说明:上面就是ActivityThread中H的定义。
现在,我们已经澄清了msg.target是H类的实例。那么,再次回到 msg.target.dispatchMessage(msg)中,它实际上是调用的Handler类(H类的父类)的dispatchMessage()函数。
public class Handler {

    ...

    public void dispatchMessage(Message msg) {
        if (msg.callback != null) {
            handleCallback(msg);
        } else {
            if (mCallback != null) {
                if (mCallback.handleMessage(msg)) {
                    return;
                }
            }
            handleMessage(msg);
        }
    }

    ...

}
说明:在本文的示例ActivityThread中,msg.callback为空。dispatchMessage()最终会调用handleMessage()处理消息。下面看看H中handleMessage()的代码。
public final class ActivityThread {

    ...

    final H mH = new H();

    ...

    private class H extends Handler {
        ...

        public void handleMessage(Message msg) {
            ...

            switch (msg.what) {
                case LAUNCH_ACTIVITY: {
                    Trace.traceBegin(Trace.TRACE_TAG_ACTIVITY_MANAGER, "activityStart");
                    ActivityClientRecord r = (ActivityClientRecord)msg.obj;

                    r.packageInfo = getPackageInfoNoCheck(
                            r.activityInfo.applicationInfo, r.compatInfo);
                    handleLaunchActivity(r, null);
                    Trace.traceEnd(Trace.TRACE_TAG_ACTIVITY_MANAGER);
                } break;

                ...
            }
        }
    }
}
说明:handleMessage()的内容不是重点,需要关注的是:消息队列的消息最终是通过handleMessage()来处理的!
至此,消息机制的发送/接受/处理消息部分都介绍完毕了!总的来说:
(01),应用程序先通过Looper.prepareMainLooper()来创建消息队列。在创建消息队列的过程中,会创建Looper对象,MessageQueue对象,并调用JNI函数;最终,通过管道来进入空闲等待状态。
(02),当应用程序调用sendMessage()或其他类似接口发送消息时,消息会被添加到消息队列;并最终会先管道中写入内容,从而唤醒管道上处于空闲等待状态的主线程。
(03),管道上的空闲状态的主线程被唤醒之后,就会读出消息队列的消息,然后通过dispatchMessage()来分发处理。最终,消息会通过handleMessage()来进行处理。