Fragment的内容很多。本章介绍Fragment的基础知识,包括:生命周期,以及如何使用Fragment。
目录
1. Fragment生命周期图
2. Fragment创建方式
3. Google示例说明
Fragment生命周期图
Fragment的生命周期图如下:
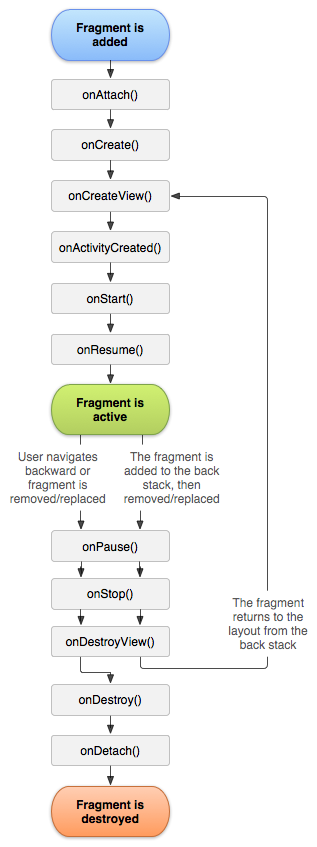
说明:总的来说,Fragment和Activity的生命周期类似。需要注意的是,它相比于Activity,多了onAttach(), onDetch(), onCreateView()和onDestroyView()这几个回调函数;但是,却少了onRestart()。
点击查看:Fragment生命周期测试源码"
Fragment创建方式
Fragment有两种使用方式:静态方式 和 动态方式。
1. 静态方式
第一步:先定义一个Fragment子类。
public class ExampleFragment extends Fragment {

    @Override
    public View onCreateView(LayoutInflater inflater, ViewGroup container,
            Bundle savedInstanceState) {
        return inflater.inflate(R.layout.example_fragment, container, false);
    }
}
说明:ExampleFragment是Fragment的子类,它的布局定义是example_fragment.xml文件。
第二步:定义Fragment子类对应的布局文件。
<?xml version="1.0" encoding="utf-8"?>
<LinearLayout xmlns:android="http://schemas.android.com/apk/res/android"
    xmlns:tools="http://schemas.android.com/tools"
    android:layout_width="match_parent"
    android:layout_height="match_parent"
    android:orientation="horizontal" >

    <EditText android:id="@+id/edit_message"
        android:layout_width="0dp"
        android:layout_height="wrap_content"
        android:layout_weight="1"
        android:hint="@string/edit_message" />

    <Button
        android:layout_width="wrap_content"
        android:layout_height="wrap_content"
        android:text="@string/button_send"
        android:onClick="sendMessage" />

</LinearLayout>
说明:上面是example_fragment.xml的内容。
第三步:在需要用到该Fragment的Activity对应的布局中使用该Fragment。
下面是引用Fragment的Activity的代码:
public class FragmentLayoutTest extends Activity
{
    /** Called when the activity is first created. */
    @Override
    public void onCreate(Bundle savedInstanceState)
    {
        super.onCreate(savedInstanceState);
        setContentView(R.layout.main);
    }
}
下面是main.xml的内容:
<?xml version="1.0" encoding="utf-8"?>
<LinearLayout xmlns:android="http://schemas.android.com/apk/res/android"
    android:orientation="vertical"
    android:layout_width="fill_parent"
    android:layout_height="fill_parent"
    >
    <TextView
        android:layout_width="fill_parent"
        android:layout_height="wrap_content"
        android:text="@string/fragment_intro"
        />

   <fragment android:name="com.skw.fragmentlayouttest.ExampleFragment"
        android:id="@+id/frag_example"
        android:layout_weight="1"
        android:layout_width="match_parent"
        android:layout_height="match_parent"/>

</LinearLayout>
说明:在该布局文件中通过
点击查看:静态方式的完整源码
2. 动态方式
重复"上面的第一步和第二步",实现一个Fragment子类。
第三步:在需要用到该Fragment的Activity对应的布局中使用定义一个FrameLayout。
<?xml version="1.0" encoding="utf-8"?>
<LinearLayout xmlns:android="http://schemas.android.com/apk/res/android"
    android:orientation="vertical"
    android:layout_width="fill_parent"
    android:layout_height="fill_parent"
    >

    <TextView
        android:layout_width="fill_parent"
        android:layout_height="wrap_content"
        android:text="@string/fragment_intro"
        />

    <FrameLayout
        android:id="@+id/frag_example"
        android:layout_width="match_parent"
        android:layout_height="match_parent"/>

</LinearLayout>
第四步:在Activity中将Fragment填充到FrameLayout中。
public class FragmentLayoutTest extends Activity {

    @Override
    protected void onCreate(Bundle savedInstanceState) {
        super.onCreate(savedInstanceState);
        setContentView(R.layout.main);

        // 获取FragmentManager
        FragmentManager fragmentManager = getFragmentManager();
        // 获取FragmentTransaction
        FragmentTransaction fragmentTransaction = fragmentManager.beginTransaction();

        // 获取ExampleFragment
        ExampleFragment fragment = new ExampleFragment();
        // 将fragment添加到容器frag_example中
        fragmentTransaction.add(R.id.frag_example, fragment);
        fragmentTransaction.commit();
    }
}
点击查看:动态方式的完整源码
Google示例说明
点击查看:Google给出的Fragment的源码
Google的官网上以此APK来对Fragment进行了简单介绍,点击查看:Google官网Fragment简介
实际上,Google官网关于Fragment的讲解内容包括三部分:创建Fragment,用Fragment创建灵活的UI,Fragments之间的通信。
- 如何创建Fragment,我在上面已经详细介绍过了。
- 灵活的创建UI,主要是指采用动态方式创建Fragment,并根据屏幕大小,来选择适当的Fragment对UI进行布局。
- Fragment之间的通信。Fragments之间是无法直接通信的,那怎么办呢?Google官网给出的解答是,采用类似于回调函数的机制。Fragment都是通过Acitivty来显示的,不同的Fragment可以通过Activity这个中介来进行通信。具体的做法是在Fragment给出接口定义,然后再在Activity中实现给接口,从而实现不同Fragment之间的通信。