本章介绍"适配器模式"。
1. 适配器模式简介
适配器(Adapter)模式,是结构型模式。它的作用是将一个类的接口转换成客户端所希望的另外一个接口,从而使原本因接口不匹配而无法在一起工作的两个类能够一起工作。
一个很典型的示例就是笔记本的适配器。美国的生活电压是110V,中国的生活电压是220V。现在,我们要在美国使用中国生产的笔记本(笔记本的额定功率是220V),则需要通过适配器将110V转换成笔记本所需要的220V电压。在这个例子中,笔记的适配器就是"设计模式中的适配器",它将电压有110V转换为220V,从而使得电器能够工作。
适用情况
(01) 你想使用一个已经存在的类,而它的接口不符合你的需求。
(02) 你想创建一个可以复用的类,该类可以与其他不相关的类或不可预见的类(即那些接口可能不一定兼容的类)协同工作。
(03) (仅适用于对象Adapter)你想使用一些已经存在的子类,但是不可能对每一个都进行子类化以匹配它们的接口。对象适配器可以适配它的父类接口。
适配器模式有两种不同的形式:类适配器 和 对象适配器
2. 类适配器
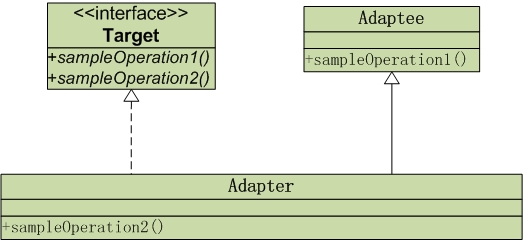
类适配器把"被适配的类的API" 转换成 "目标类的API"。它的UML类图如下:

客户端需要使用Adaptee的sampleOperation2()方法,但是Adaptee类中只有sampleOperation1(),没有sampleOperation2()方法。怎么办呢?为了使客户端能够使用Adaptee类,我们提供一个适配器(Adapter类)进行转换;将Target接口提供给客户,Target接口同时提供sampleOperation1()和sampleOperation2()接口。Target具体的实现是通过适配器Adataper来实现的。
该模型中共涉及到3个角色:目标(Target),源(Adaptee)和适配器(Adapter)。
| 角色 | 说明 |
|---|---|
| 源 | 现有的接口。 |
| 目标 | 提供给客户端的接口。由于"源"中的接口不能满足需求,因此就扩展出来了目标,它包括了客户所需的接口。在适配器模式中,目标角色对应的类一般是抽象类或接口,而不是实例类。 |
| 适配器 | 把源接口转换成目标接口。 |
示意代码
public interface Target {
    // "源"类中已有的方法
    void sampleOperation1();
    // "源"类中没有的方法
    void sampleOperation2();
}
public class Adaptee {
    // "源"类中已有的方法
    public void sampleOperation1() { }
}
public class Adapter extends Adaptee implements Target {
    // Adapter中提供客户所需要的接口
    public void sampleOperation2() { }
}
3. 对象适配器
与类适配器一样,对象适配器也是把"被适配的类的API" 转换成 "目标类的API"。不同的是,类适配器中"Adapter和Adaptee是继承关系",而对象适配器中"Adapter和Adaptee是关联关系(Adapter中存在Adaptee类型的成员变量)"。它结构图如下:

该模型中共涉及到3个角色:目标(Target),源(Adaptee)和适配器(Adapter)。
| 角色 | 说明 |
|---|---|
| 源 | 现有的接口。 |
| 目标 | 提供给客户端的接口。由于"源"中的接口不能满足需求,因此就扩展出来了目标,它包括了客户所需的接口。在适配器模式中,目标角色对应的类一般是抽象类或接口,而不是实例类。 |
| 适配器 | 把源接口转换成目标接口。 |
示意代码
public interface Target {
    // "源"类中已有的方法
    void sampleOperation1();
    // "源"类中没有的方法
    void sampleOperation2();
}
public class Adaptee {
    // "源"类中已有的方法
    public class void sampleOperation1() { }
}
public class Adapter implements Target {
    private Adaptee adaptee;

    public Adapter(Adaptee adaptee) {
        super();
        this.adaptee = adaptee;
    }
    // 调用"源"类中已有的方法
    public void sampleOperation1() {
        adaptee.sampleOperation1();
    }
    // Adapter中提供客户所需要的接口
    public class void sampleOperation2() { }
}
4. 适配器模式示例
现在通过"适配器模式"实现:笔记本的适配器电压转换模型,在美国的生活电压是110V,而笔记本需要的电压是220V。
4.1 "类适配器"实现
下面是通过"类适配器模式"的实现代码。
interface Target {
    // Adaptee能提供的电压110V
    void getPower110V() ;
    // 客户需要的电压220V
    void getPower220V() ;
}

class Adaptee {
    public void getPower110V() {
        System.out.println("get power: 110V");
    }

}

class Adapter extends Adaptee implements Target{
    public void getPower220V() {
        System.out.println("get power: 220V");
    }
}

public class ClassAdapter {

    public static void main(String[] args) {
        Target target = new Adapter();
        target.getPower220V();
    }
}
运行结果:
get power: 220V
4.2 "对象适配器"实现
下面是通过"对象适配器"的实现代码。
interface Target {
    // Adaptee能提供的电压110V
    void getPower110V() ;
    // 客户需要的电压220V
    void getPower220V() ;
}

class Adaptee {
    public void getPower110V() {
        System.out.println("get power: 110V");
    }

}

class Adapter extends Adaptee implements Target{
    private Adaptee adaptee;

    public Adapter(Adaptee adaptee) {
        super();
        this.adaptee = adaptee;
    }
    // 调用"源"类中已有的方法
    public void getPower110V() {
        adaptee.getPower110V();
    }
    public void getPower220V() {
        System.out.println("get power: 220V");
    }
}

public class ObjectAdapter {

    public static void main(String[] args) {
        Adaptee adaptee = new Adaptee();
        Target target = new Adapter(adaptee);
        target.getPower220V();
    }
}
运行结果:
get power: 220V